
Uninterrupted Watch: Your Guide to Outdoor Wireless Security Cameras with Solar Power
Home security has evolved dramatically over the past decade. The clunky, wired systems of yesterday have given way to sleek, wireless alternatives that offer greater flexibility and easier installation. Yet even the best battery-powered cameras come with a significant drawback: the need for regular recharging or battery replacement. This is where solar-powered security cameras shine, offering a sustainable solution that combines the freedom of wireless operation with the reliability of continuous power.
Whether you're looking to monitor a remote property, secure your home's perimeter, or simply reduce your environmental footprint, solar-powered security cameras offer an elegant solution. This comprehensive guide will walk you through everything you need to know about these innovative devices—from how they work and what features to look for, to installation tips and our top recommendations for 2024-2025.
Understanding Solar-Powered Wireless Security Cameras

Solar-powered security cameras represent the perfect marriage between renewable energy and modern surveillance technology. Unlike traditional wireless cameras that rely solely on rechargeable batteries, these innovative devices harness the power of the sun to keep their batteries topped up, significantly extending—or even eliminating—the need for manual recharging.
How Solar Charging Works for Security Cameras
At their core, solar-powered security cameras operate using a simple yet effective system. They feature photovoltaic panels that convert sunlight into electrical energy, which is then used to power the camera and charge its internal battery. This dual-power approach ensures the camera can operate continuously, even during periods of limited sunlight.
Integrated Solar Panels
Many modern solar security cameras come with built-in solar panels directly attached to the camera housing. This all-in-one design offers a sleek, compact solution that's easier to install and less conspicuous. The integrated panels are typically smaller but sufficient for maintaining battery charge under normal conditions.
External Solar Panels
Some systems utilize separate solar panels connected to the camera via a cable. These external panels can be positioned for optimal sun exposure independent of the camera's placement. They generally offer more charging power but require additional installation considerations and may be more noticeable.
The rechargeable batteries in these cameras serve as energy storage, collecting power during daylight hours and using it to run the camera continuously. Most models use lithium-ion batteries that can hold a charge for extended periods, ensuring operation through the night and during cloudy days.
Key Benefits: True Wireless Freedom, Eco-Friendliness, Cost Savings

Advantages of Solar Security Cameras
- True wireless operation with no power cables required
- Environmentally friendly, reducing carbon footprint
- Lower long-term operating costs with free solar energy
- Reduced maintenance with fewer battery changes
- Ideal for remote locations without easy access to power
- Continuous operation even during power outages
- Flexible placement options not limited by outlet locations
Potential Drawbacks
- Higher initial purchase cost compared to standard wireless cameras
- Performance depends on adequate sunlight exposure
- May require supplemental charging during extended cloudy periods
- Installation location must balance security needs with solar exposure
- Larger footprint due to solar panel requirements
- Some models have less powerful features to conserve energy
The most compelling advantage of solar-powered security cameras is their ability to operate indefinitely without the need for manual recharging or replacement batteries. This makes them particularly valuable for monitoring remote areas, large properties, or locations where accessing the camera for maintenance is challenging.
Beyond convenience, these cameras offer significant environmental benefits by reducing battery waste and utilizing renewable energy. For eco-conscious homeowners, this sustainable approach to security aligns with broader goals of reducing household carbon footprints.
Essential Features to Look for in Solar-Powered Outdoor Cameras
Not all solar security cameras are created equal. When shopping for these devices, several key features can make the difference between a reliable security solution and a frustrating experience. Here's what to consider before making your purchase:
Video Quality & Field of View (FOV)
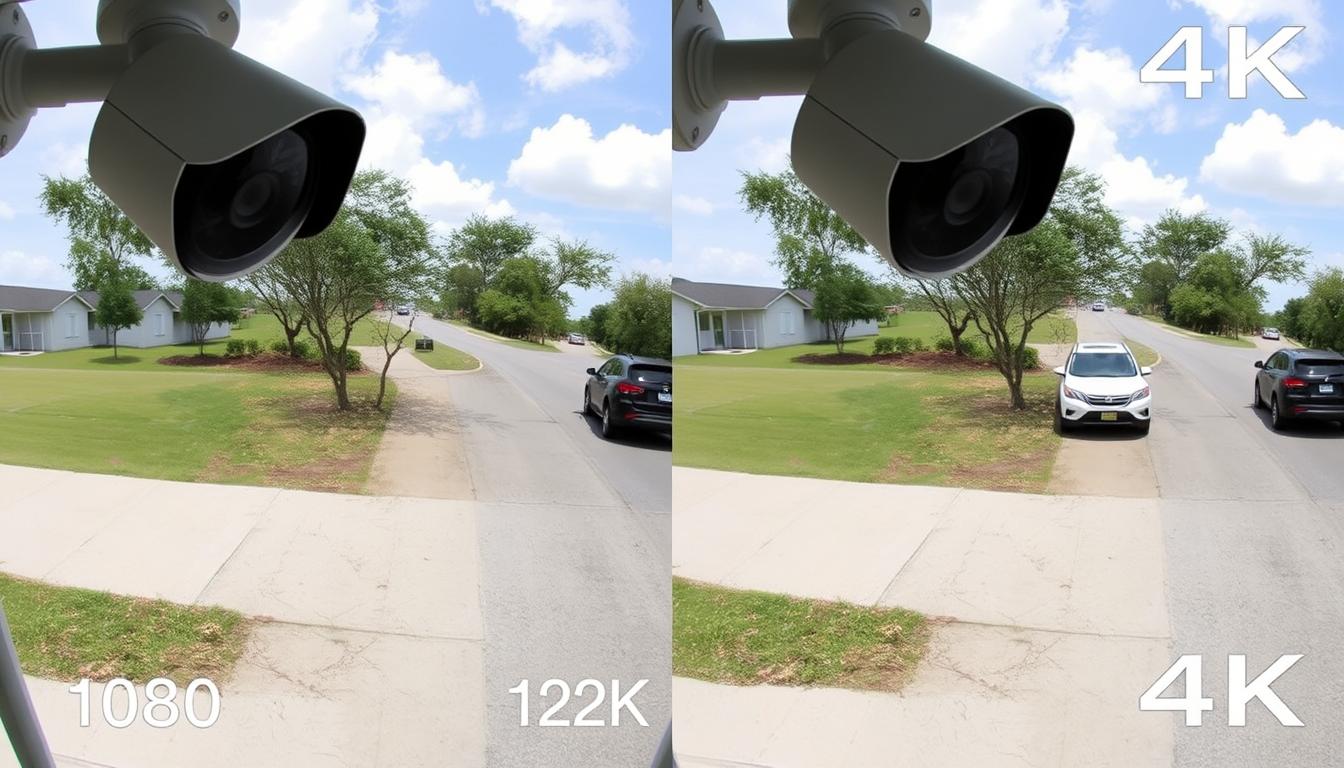
Resolution is perhaps the most important technical specification to consider. While 1080p Full HD has been the standard for years, many solar cameras now offer 2K or even 4K resolution. Higher resolution provides more detail, which is crucial for identifying faces, license plates, or other specific details in recorded footage.
Field of view (FOV) determines how wide an area your camera can monitor. Most outdoor cameras offer between 110° and 180° field of view. Wider angles cover more area but may reduce detail at the edges. For comprehensive coverage of larger areas, look for cameras with at least 130° FOV.
Night Vision Capabilities

Effective night vision is crucial for 24/7 security. Most solar cameras use infrared (IR) LEDs to capture black-and-white footage in darkness. Higher-end models offer color night vision, which provides more detail but typically requires more power—an important consideration for solar-powered devices.
When evaluating night vision capabilities, look for cameras that specify their range. A good outdoor camera should offer night vision that extends at least 30 feet, though some premium models can reach 50 feet or more. Some cameras also include built-in spotlights that can be triggered by motion, providing color footage even at night while serving as a deterrent.
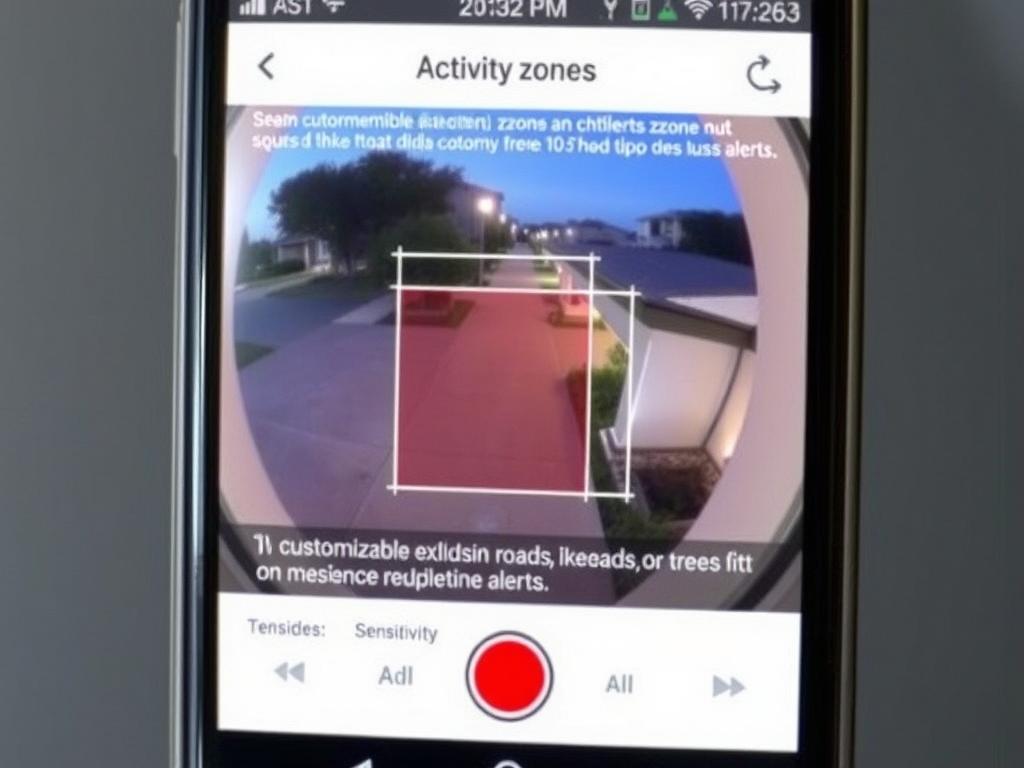
Motion Detection: PIR, AI-Powered

Advanced motion detection capabilities reduce false alerts while ensuring you capture important events. Most solar cameras use passive infrared (PIR) sensors that detect heat signatures from moving objects. This technology is energy-efficient but can be triggered by non-threatening movements like swaying branches or passing animals.
AI-powered detection represents a significant upgrade, using sophisticated algorithms to distinguish between people, vehicles, animals, and other motion sources. This smart filtering dramatically reduces false alerts and allows for customized notifications based on the type of movement detected.
Pro Tip: Look for cameras that allow you to create custom motion zones. This feature lets you specify which areas of the camera's view should trigger alerts, ignoring movement in other areas—perfect for excluding busy streets or neighboring properties.
Two-Way Audio & Siren/Spotlight
Two-way audio functionality allows you to both hear what's happening in the camera's vicinity and speak through the camera's built-in speaker. This interactive feature can be invaluable for communicating with visitors or deterring potential intruders without physically approaching the camera location.
Many solar cameras also include built-in sirens and spotlights that can be manually triggered or automatically activated when motion is detected. These features serve as effective deterrents and can illuminate areas for better nighttime video quality.
Local vs. Cloud Storage
Local Storage
- Typically uses microSD cards (up to 128GB or 256GB)
- One-time cost with no subscription fees
- Complete privacy with data stored on your property
- Limited storage capacity requires periodic management
- Risk of data loss if camera is damaged or stolen
Cloud Storage
- Footage stored securely on remote servers
- Accessible from anywhere via internet connection
- Protected from physical damage or theft
- Requires ongoing subscription fees
- Dependent on internet connectivity
- Potential privacy concerns with third-party storage
How your camera stores recorded footage is a critical consideration. Local storage via microSD cards offers a one-time cost solution with complete privacy, while cloud storage provides greater security against theft and remote access capabilities but typically requires monthly subscription fees.
Many premium cameras offer both options, giving you the flexibility to choose based on your specific needs. Some manufacturers also offer limited free cloud storage (typically 7-30 days) before requiring a paid subscription for extended storage.
Weather Resistance Ratings

For outdoor installation, weather resistance is non-negotiable. Look for cameras with an IP (Ingress Protection) rating of at least IP65, which indicates complete protection against dust and resistance to water jets from any direction. Higher ratings like IP66 or IP67 offer even better protection against heavy rain and temporary submersion.
Beyond water resistance, consider the camera's operating temperature range, especially if you live in an area with extreme weather conditions. Quality outdoor cameras should function reliably in temperatures ranging from around -4°F to 122°F (-20°C to 50°C).
Battery Capacity & Solar Panel Efficiency
The battery capacity directly impacts how long your camera can operate without sufficient sunlight. Look for cameras with large-capacity lithium-ion batteries (typically 5,000mAh or higher) that can power the device for several days to weeks without solar charging.
Solar panel efficiency determines how effectively the panel converts sunlight into usable power. While manufacturers rarely specify exact efficiency ratings, larger panels generally produce more power. Some manufacturers provide estimates of how much daily sunlight is needed to maintain the battery, which can be a useful comparison point.
Battery Backup Time: A good solar security camera should operate for at least 7 days on battery power alone during periods of limited sunlight. Premium models may extend this to several weeks or even months.
Top Picks: Best Outdoor Wireless Security Cameras with Solar Power (2024-2025)
After extensive research and testing, we've identified the top solar-powered security cameras across different price points and feature sets. These recommendations balance video quality, battery performance, solar efficiency, and overall value to help you find the perfect match for your specific needs.
Premium Options for Comprehensive Coverage


Best Value Picks for Reliable Solar Security


Integrated Solar Panel vs. Separate Solar Panel Models

Integrated Solar Panel Cameras
Cameras with built-in solar panels offer a sleeker, all-in-one design that's visually less intrusive. The EufyCam 3 and Eufy SoloCam series exemplify this approach, with solar panels seamlessly integrated into the camera housing.
Advantages:
- Cleaner aesthetic with single-unit design
- Simpler installation with fewer components
- No separate cables to route or secure
- Often more weather-resistant as a unified system
Disadvantages:
- Camera position must balance security needs with solar exposure
- Typically smaller solar panels with less charging capacity
- Limited flexibility in panel positioning
Separate Solar Panel Cameras
Models like the Arlo Pro 4 and Reolink Argus use separate solar panels connected to the camera via a cable. This design offers greater flexibility in positioning both components for optimal performance.
Advantages:
- Camera can be placed in optimal security position
- Solar panel can be positioned for maximum sun exposure
- Typically larger panels with greater charging capacity
- Panels can often be upgraded or replaced independently
Disadvantages:
- More complex installation with multiple components
- Exposed cable may be vulnerable to damage
- Less visually streamlined appearance
"When choosing between integrated and separate solar panels, consider your specific installation location. If you have a spot that receives ample sunlight and provides good security coverage, an integrated model offers simplicity. For locations where the ideal camera position doesn't receive good sunlight, a separate panel provides the flexibility to optimize both security and solar charging."
Step-by-Step Installation Guide for Solar Security Cameras

Installing a solar-powered security camera is generally straightforward, but proper planning and execution are crucial for optimal performance. Follow these steps to ensure your camera operates reliably and efficiently.
Step 1: Site Selection (Crucial for Solar Efficiency & Coverage)

The most critical step in installing a solar security camera is selecting the right location. You'll need to balance security coverage needs with optimal solar exposure.
Identifying Optimal Sunlight Exposure
- In the Northern Hemisphere, south-facing locations receive the most sunlight
- Avoid areas shaded by trees, buildings, or other structures
- Consider seasonal sun patterns—winter sun is lower in the sky
- Aim for locations that receive at least 4-6 hours of direct sunlight daily
- Use a sunlight tracking app to identify the sunniest spots throughout the day
Minimizing Obstructions and Maximizing Wi-Fi Signal
Beyond solar considerations, your camera location must also have:
- Strong Wi-Fi signal (test with your phone before installation)
- Clear view of the area you want to monitor
- Protection from extreme weather when possible
- Sufficient height (typically 8-10 feet) to prevent tampering
- Accessibility for maintenance when needed
Important: Never compromise security coverage for solar efficiency. If the ideal security position doesn't receive adequate sunlight, consider a model with a separate solar panel that can be positioned independently for optimal charging.
Step 2: Mounting the Camera and Solar Panel

Tools Required
- Power drill with appropriate bits
- Screwdriver (typically Phillips head)
- Pencil for marking drill holes
- Level to ensure straight installation
- Ladder for reaching higher mounting positions
- Measuring tape
- Appropriate screws and anchors (usually included with camera)
Secure Mounting Techniques
- Unbox your camera and identify all components
- Charge the camera battery fully before installation
- Hold the mounting bracket in your chosen location and use a level to ensure it's straight
- Mark the screw hole positions with a pencil
- For wood surfaces, drill pilot holes slightly smaller than your screws
- For masonry, drill appropriate-sized holes and insert anchors
- Secure the mounting bracket with screws, ensuring it's firmly attached
- Attach the camera to the bracket according to manufacturer instructions
- If using a separate solar panel, mount it in the sunniest location within cable reach of the camera
- Angle the solar panel to face the sun's path (typically south in the Northern Hemisphere)
- Secure all cables with cable clips to prevent wind damage
Pro Tip: For optimal solar charging, position solar panels at a 30-45 degree angle facing south (in the Northern Hemisphere). This maximizes sun exposure throughout the day and helps snow or rain naturally slide off the panel.
Step 3: Connecting to Your Wi-Fi Network and Smart Home App

Once your camera is physically installed, you'll need to connect it to your home network and set it up in the manufacturer's app.
Initial Pairing Process
- Download the manufacturer's app on your smartphone (e.g., Arlo, Eufy Security, Ring)
- Create an account or log in to your existing account
- Follow the app's instructions to add a new device
- Most cameras use QR codes or Bluetooth for initial pairing
- When prompted, select your home Wi-Fi network and enter the password
- Wait for the camera to connect (this may take several minutes)
- Once connected, the app will likely prompt you to update the camera's firmware
- Complete the setup by naming your camera and configuring basic settings
Optimizing Wi-Fi Signal at the Camera Location
If your camera struggles to maintain a strong Wi-Fi connection:
- Consider installing a Wi-Fi extender to boost signal in that area
- Ensure your router is centrally located in your home
- Minimize obstructions between the router and camera
- Some cameras work better on 2.4GHz networks (longer range) than 5GHz
- For very remote locations, consider cameras with cellular connectivity options
Step 4: Configuring Settings (Motion Zones, Notifications, Recording)

Properly configuring your camera's settings is essential for reliable performance and minimizing false alerts.
Essential Configuration Steps
- Set up motion detection zones to focus on relevant areas and exclude high-traffic areas like roads
- Adjust motion sensitivity based on your environment (lower for areas with moving trees or flags)
- Configure notification preferences (push notifications, email alerts, etc.)
- Set up recording preferences (continuous, motion-triggered, or scheduled)
- Configure smart detection settings if available (person, vehicle, animal detection)
- Set up any integration with smart home platforms (Alexa, Google Home, Apple HomeKit)
- Test the system by walking through detection zones and verifying alerts
- Adjust settings as needed based on testing results
Battery Conservation: To maximize battery life and solar efficiency, consider adjusting recording length, using smart detection to filter alerts, and setting up recording schedules during high-activity periods.
Troubleshooting Common Issues with Solar-Powered Security Cameras
Even with proper installation, you may encounter occasional issues with your solar security camera. Here are solutions to the most common problems:
"Camera Not Charging" or Low Battery Alerts

If your camera isn't charging properly or you're receiving low battery warnings despite adequate sunlight:
Checking Solar Panel Placement, Sunlight, Debris
- Ensure the solar panel is receiving direct sunlight for at least 4-6 hours daily
- Clean the solar panel surface to remove dust, pollen, leaves, or bird droppings
- Check for new obstructions that may be casting shadows (growing branches, new structures)
- Verify the panel is still properly angled toward the sun
- Consider seasonal adjustments—winter may require repositioning due to the sun's lower angle
Troubleshooting Faulty Panels or Cables
- Inspect the cable connecting the solar panel to the camera for damage
- Check connection points for corrosion or loose connections
- Verify the solar panel is properly connected to the camera
- If possible, test the camera with direct charging to isolate solar panel issues
- Contact manufacturer support if problems persist—the panel may need replacement
Intermittent Connectivity or Dropped Recordings
Connectivity issues can result in missed events or inability to access live views:
Wi-Fi Signal Strength Optimization
- Check Wi-Fi signal strength at the camera location using your smartphone
- Install a Wi-Fi extender or mesh network node to improve coverage
- Ensure your router firmware is up to date
- Try changing your router's channel to reduce interference
- For dual-band routers, ensure the camera is connected to the 2.4GHz network for better range
Router Interference
- Keep your router away from other electronic devices that may cause interference
- Ensure the router isn't enclosed in a cabinet or behind thick walls
- Consider upgrading to a more powerful router if problems persist
- Check if other devices on your network are consuming excessive bandwidth
False Motion Alerts
Excessive notifications for non-security events can lead to alert fatigue:
Adjusting Sensitivity, Creating Activity Zones
- Reduce motion sensitivity in the camera settings
- Create or adjust activity zones to exclude high-movement areas like roads or swaying trees
- Enable smart detection features that can distinguish between people, vehicles, and other motion
- Set up schedules to reduce sensitivity during known high-activity periods
- Position the camera to avoid direct exposure to moving foliage or reflective surfaces
Night Vision Problems
Poor nighttime video quality can significantly impact your camera's effectiveness:
- Clean the camera lens and IR sensors to remove dirt or spider webs
- Check for reflective surfaces near the camera that might cause IR bounce-back
- Ensure the camera isn't positioned behind glass, which can block IR night vision
- For color night vision, verify that any integrated spotlights are functioning
- Adjust night vision settings in the app if available
- Consider adding supplementary lighting for improved nighttime visibility
Maximizing Your Solar Security Camera's Performance & Longevity

With proper care and maintenance, your solar security camera can provide reliable service for years. Follow these best practices to maximize performance and longevity:
Regular Cleaning of Solar Panel
- Clean the solar panel every 3-6 months, or more frequently in dusty areas
- Use a soft, damp cloth to gently remove dust and debris
- For stubborn dirt, use mild soap and water (never harsh chemicals)
- Clean early morning or evening to avoid hot panels
- Check for and remove any debris that may cast shadows on the panel
- In winter, carefully remove snow accumulation to maintain charging
Firmware Updates for Optimal Functionality
- Enable automatic firmware updates in your camera's app settings if available
- Regularly check for manual updates if automatic updates aren't available
- Read release notes to understand new features or security improvements
- Update during daylight hours when the battery is well-charged
- Ensure stable Wi-Fi connection before initiating updates
- Don't interrupt updates once they've started
Battery Health Management in Extreme Temperatures

Lithium-ion batteries in solar cameras are sensitive to temperature extremes:
- In extreme heat (above 95°F/35°C), consider positioning the camera in partial shade during the hottest part of the day
- In extreme cold (below 32°F/0°C), expect reduced battery performance and charging efficiency
- For very cold climates, consider cameras specifically rated for extreme temperatures
- During extended periods of extreme weather, monitor battery levels more frequently
- If possible, position cameras under eaves or overhangs for some weather protection
Additional Maintenance Tips
- Periodically check mounting hardware and tighten any loose screws
- Inspect cables for wear, damage, or pest activity
- Test motion detection regularly to ensure proper functioning
- Review and optimize motion zones seasonally as foliage changes
- Check notification settings periodically to ensure you're receiving alerts
- Consider refreshing weatherproof seals or gaskets after several years
"The best security camera is one that's properly maintained. A few minutes of preventative care each season can prevent hours of troubleshooting and ensure your property remains protected without interruption."
Frequently Asked Questions (FAQs) About Solar Security Cameras
Conclusion: Secure Your Outdoors, Sustainably and Smartly

Solar-powered security cameras represent the perfect marriage of sustainable technology and modern home security. By harnessing the power of the sun, these innovative devices eliminate the limitations of traditional wired and battery-powered alternatives, providing truly wireless freedom with minimal maintenance requirements.
As we've explored throughout this guide, solar security cameras offer numerous advantages: freedom from power outlets, reduced environmental impact, lower long-term operating costs, and reliable operation even during power outages. While they do require thoughtful placement to balance security needs with solar exposure, the flexibility of separate solar panel options makes them viable for virtually any outdoor location.
When selecting a solar security camera, prioritize features that match your specific security needs—whether that's ultra-high resolution for capturing fine details, advanced AI detection to reduce false alerts, or pan-tilt functionality for comprehensive coverage. Remember that proper installation and regular maintenance are key to ensuring optimal performance and longevity.
By investing in a quality solar-powered security camera system, you're not just protecting your property—you're embracing a sustainable approach to home security that aligns with broader environmental goals. As solar technology continues to advance, we can expect even more efficient and feature-rich options in the coming years, further cementing solar power as the ideal energy source for outdoor security cameras.
Ready to Secure Your Property with Solar Power?
Explore our top-recommended solar security cameras and take the first step toward sustainable, maintenance-free home protection.
Shop Solar Security Cameras